


Ooooh, that creamy blurry background. We all want that gorgeous tack sharp subject, and that beautiful blurry background behind them in our photos, don’t we? In fact, it’s one of the main reasons a lot of people buy a fancy DSLR in the first place!
Perhaps that sounds like you – you bought your fancy camera, whipped it out of the box and started snapping away…. only to find that you’re not getting the beautiful professional quality photos you hoped for right out of the gate. Ugh.
The truth is that it takes so much more than a fancy camera to get amazing results! You have to know how to set the camera up in a way that gets you the results you want, and today that’s what we are talking about!
The KEY to Blurry Backgrounds – Aperture
Have you always wondered how photographers get such beautiful blurry backgrounds in their photos with such take sharp subjects? Have you ever been frustrated that only the tip of your kids nose, or maybe just one eye is in focus, while the rest of your images is blurry?
I hear this all the time from my friends who’ve recently bought DSLR cameras. Despite the new “fancy” gear, they’re feeling frustrated that they’re still not getting the results they want.
The key to understanding how to get those results, is understanding what camera settings help make it happen!
Background blur is controlled by a camera setting called Aperture.
Aperture is one component of what’s called “The Exposure Triangle” which refers to the three components that make up the exposure, or how much light the camera is taking in and hitting the sensor when it takes a photo.
For the purpose of this post, we aren’t going to dive in to The Exposure Triangle, but let’s focus on the main component that controls aperture!
The definition of aperture is “a hole or small opening in something.” When we are talking about cameras, this small opening allows light to pass through the lens onto the camera’s sensor. Aperture is what creates the blurry backgrounds (called bokeh!) that are often sought after in photographs!
The Definition of Aperture
Aperture is always noted in your camera by the number following f/ when looking through your camera’s viewfinder, or at the exposure settings on an image.
The smaller the number, the blurrier the background, the more light that is coming into the camera. The bigger the number, the more of the image that is in focus, the less light we are letting into the camera. Now hang on tight. I’m going to give you a simple to remember trick for remembering this aperture relationship in a few!
Let’s take a look at what that means in a real life example. Here are two images taken just moments apart…
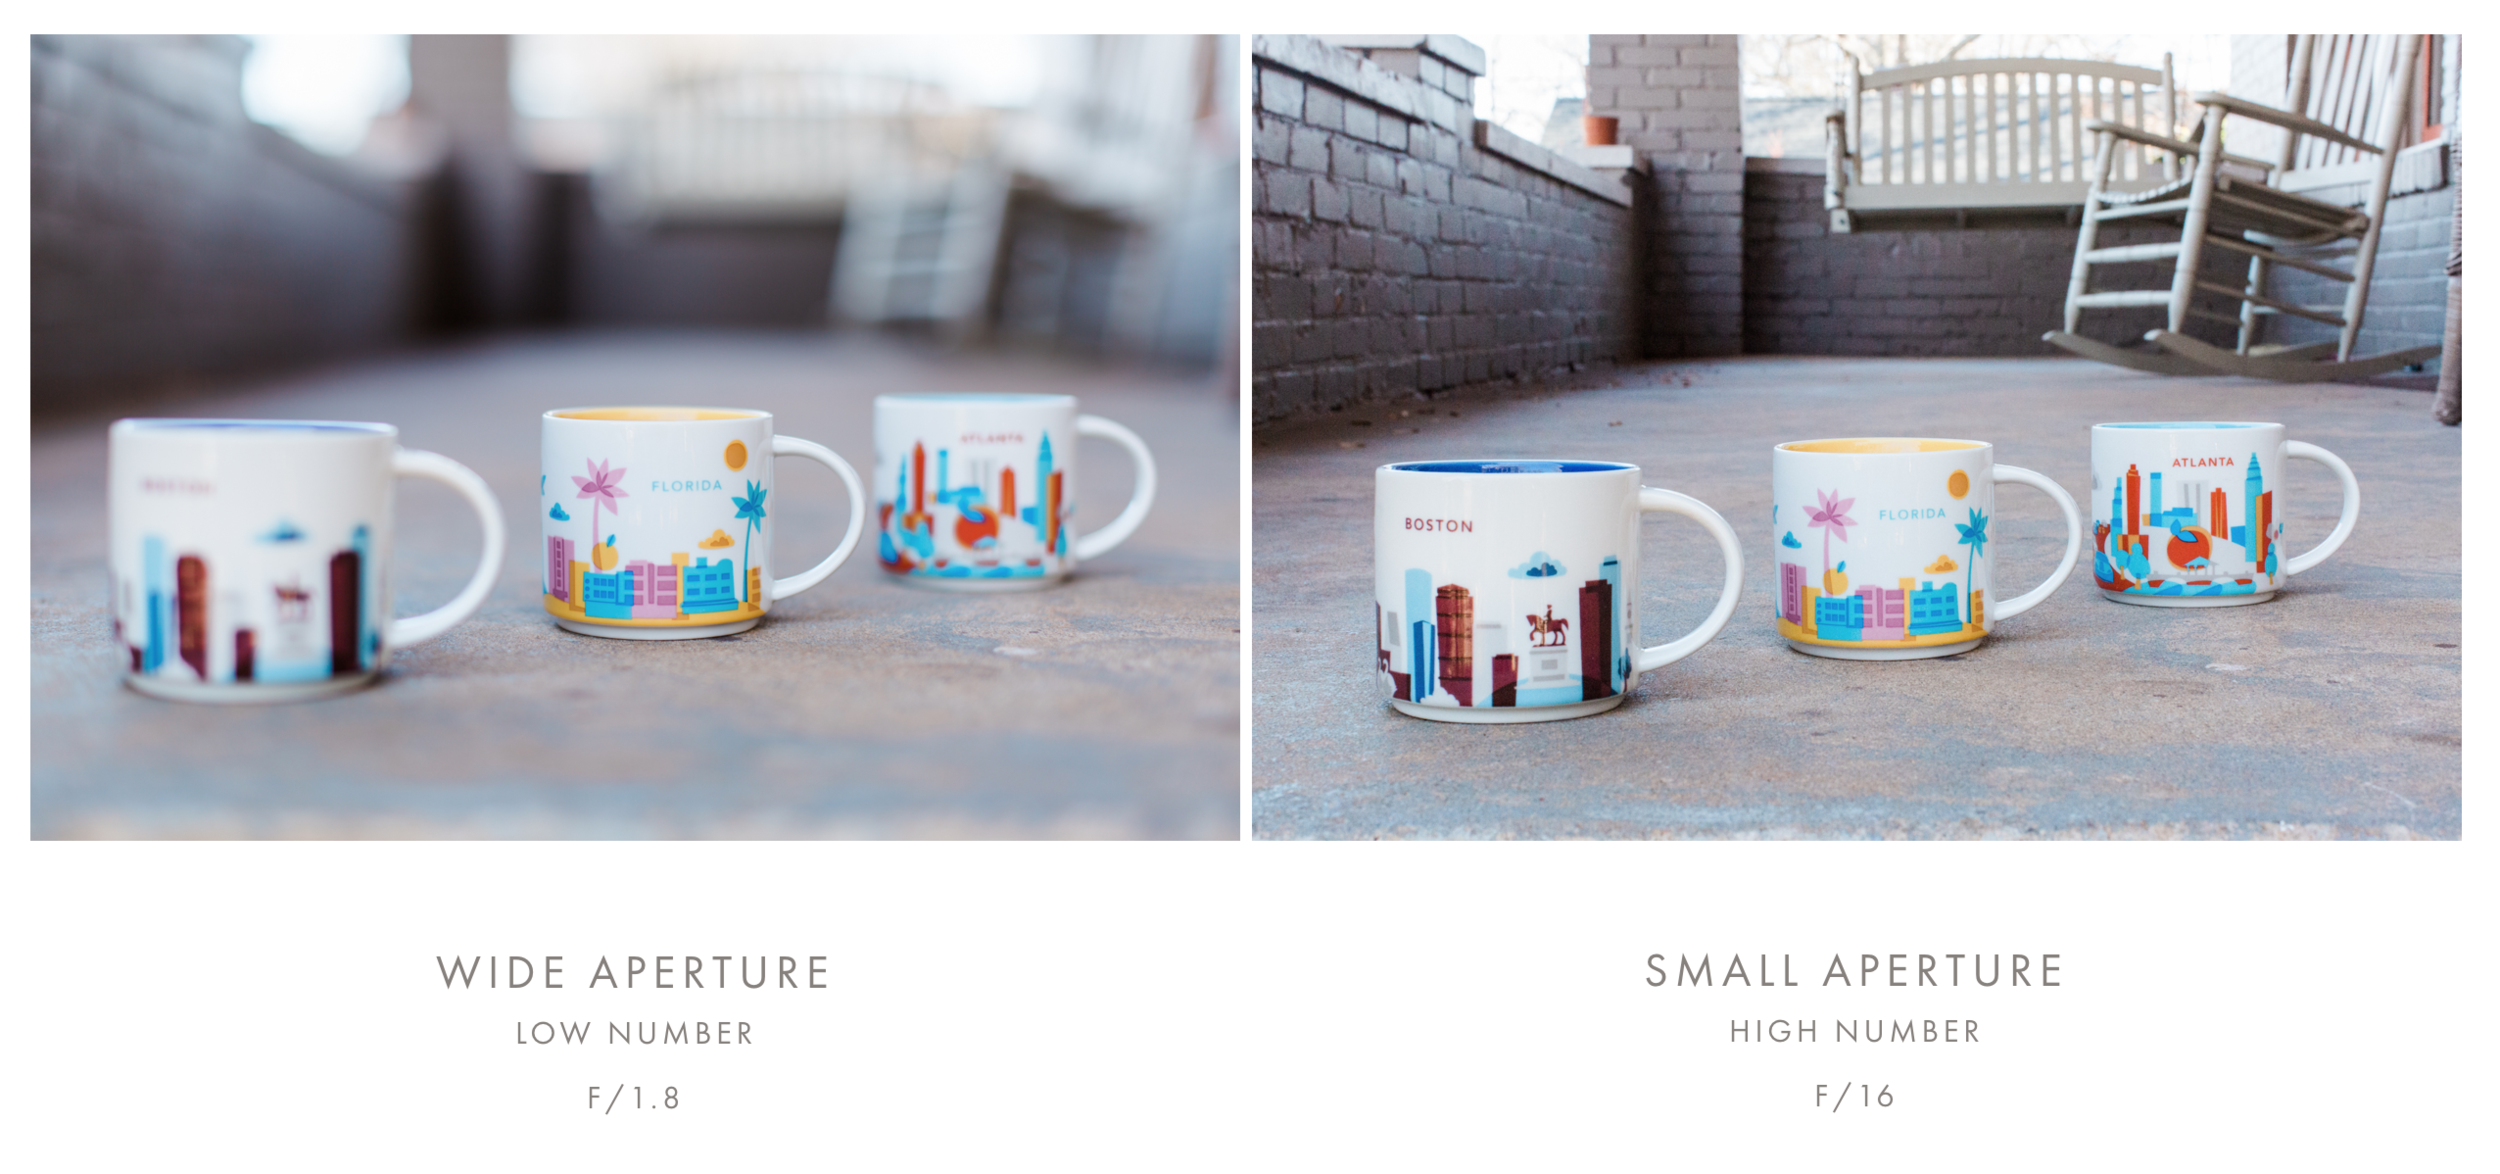
The image of the coffee mugs on the left, taken with a very low f/ number (aka a wide aperture), has a lot of background blur or bokeh (Yes! That blur has a name all of its own, and that word is bokeh which refers to the amount and quality of blur in a photo). In the image on the left, the background is so blurry that you can only see the name of the city on one mug that is in focus. On the right, the f/ number is very high (aka a narrow aperture), meaning much more of the image is in focus and we don’t get that same blur effect. In the image on the right, you can read each city on each mug.
Aperture settings have this effect on these picture, because it controls what’s called the depth of field, which refers to how much of the frame is in focus. A wide aperture (low number), creates a shallow depth of field. This often means that just one small object or person is in focus, while the rest of the image is blurry. A narrow aperture (high number) means more of the frame will be in focus.
So how do we achieve this in our photos?
Lenses
First, let’s talk about your camera lens. The range of aperture you can take a photo with is determined by the lens you are using! I highly recommend that you take a look at this post – The Difference Between Kit and Prime Lenses – to better understand how lenses limit or allow you to capture more background blur.
Here’s the quick lowdown:
Most kit lenses, meaning the lenses that come in a bundle when you purchase your camera, are REALLY limited as far as the apertures they can allow you to shoot at. The most standard kit lens is an 18-55mm 3.5-5.6 lens. That 3.5-5.6 stands for the lowest aperture ranges it can shoot at. With a kit lens, the aperture isn’t fixed. As you zoom in and out with the lens the aperture automatically changes. The number gets higher and higher, which means less and less of the background has blur, therefore limiting what you are able to capture, and the results you can achieve. A changing aperture makes it almost impossible to shoot in any other mode but automatic, which will give you even less control over your final photo!
Those numbers are also pretty high right out the gate. And what do we already know about a high f/ number? LESS background blur, making it really tough to get the results we are after.
Where you’ll really start to see the results you are after is with a PRIME lens. These lenses have fixed apertures and do not zoom, so you’re lowest possible aperture isn’t going to change. They also have the ability to have a much LOWER f/ number – which means we get what!?!? MORE BACKGROUND BLUR! Woo hooo!
So what does that mean for you?
Well, you’re here because you are obviously interested in learning how to get more background blur! If you’re using a Prime lens already, start playing with a lower aperture number. This means you’ll have to get OUT of automatic mode so you can specifically manipulate it to get that effect. You could also try shooting in Aperture Priority mode, which means you tell the camera what aperture you want, and the camera will figure out the rest.
If you DON’T have a prime lens, and aren’t getting the results you want with a kit lens, I strongly encourage you to make a small investment in your first prime lens. For entry level cameras these are VERY affordable as far as photography gear goes.
If you have a crop sensor camera, I recommend a 30 or 35mm prime lens! If you have a full frame camera, you should consider a 50mm lens!
For my Sony A6500, I have the Sigma3 0mm 1.4 lens and it’s LOVE. Look at these beautiful images captured with this lens setup!

***Make sure you confirm your camera body and lens are compatible! Each camera has a unique mounting system, and you want to make sure the lens and camera will communicate. Amazon has a “part finder” feature that should pop up when you click the above links. Search your camera, and make sure to do your due diligence on your specific camera.


https://shorturl.fm/6G5Uh